 Spovex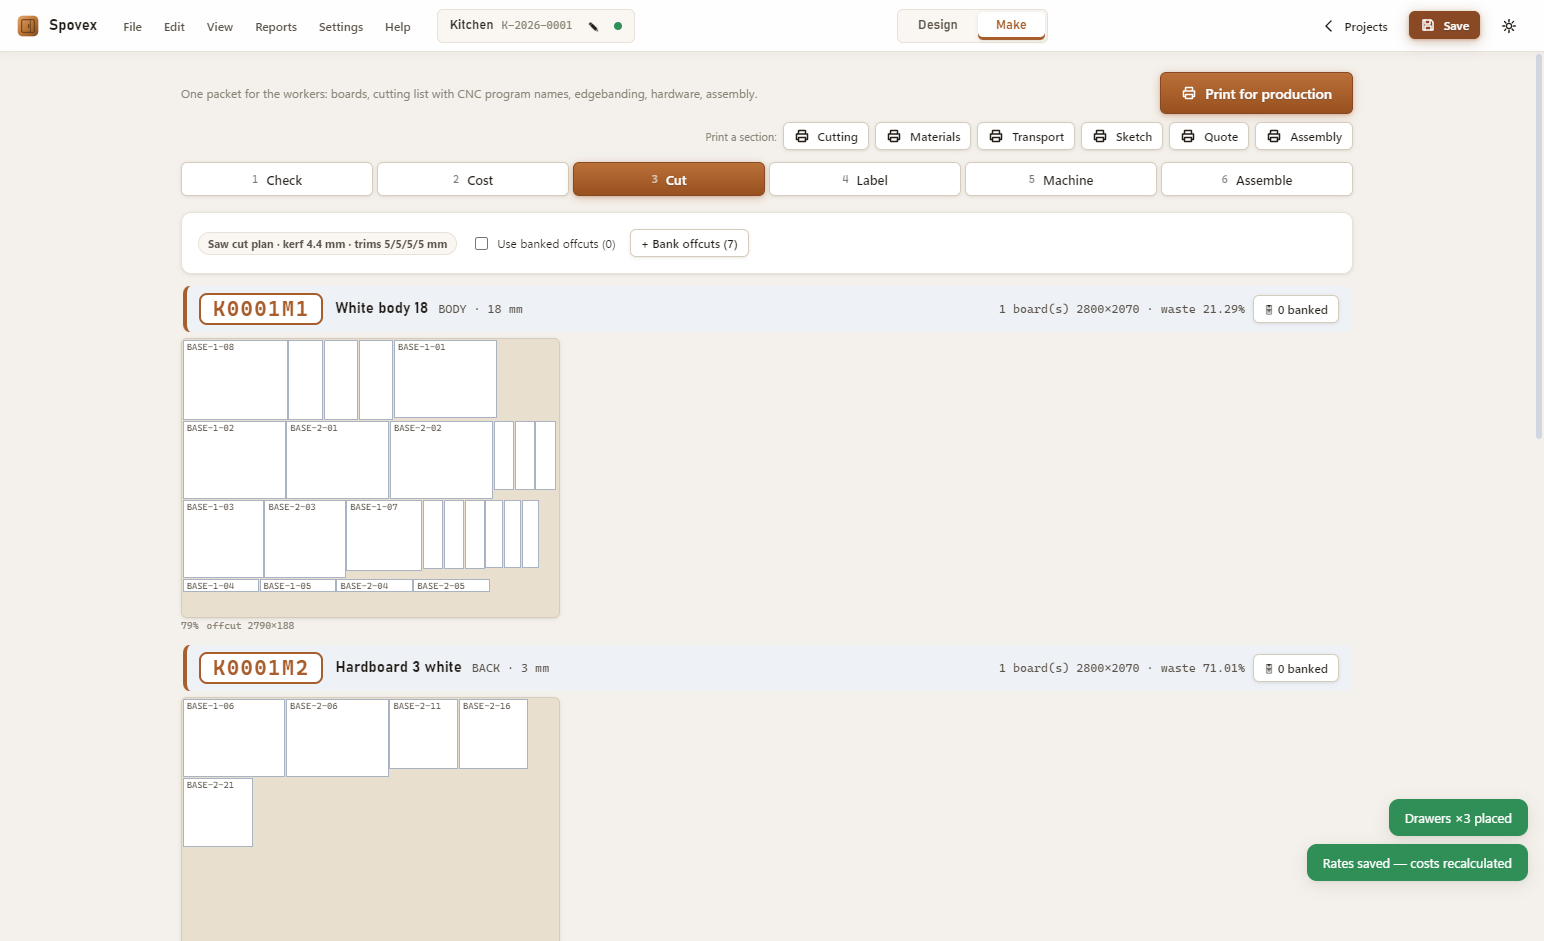
Panel material is expensive, but the price of a poor cutting plan is larger than the scrap pile alone. A bad plan can consume an extra sheet, leave awkward remnants that never return to production, create grain-direction mistakes, or send a part to the saw with assumptions that do not match the blade. Panel cutting optimization is the discipline of arranging the required parts on available boards while respecting those workshop realities.
The honest benefit is not a universal saving percentage. Results change with every job: part sizes, board dimensions, décor direction, saw rules, available offcuts and delivery timing all matter. A kitchen full of similar cabinet sides behaves differently from a one-off reception desk with many narrow pieces. The useful promise is more modest and more valuable: optimization gives the shop a repeatable way to compare layouts, avoid preventable loss and explain where each board went.
What panel cutting optimization actually does
For rectangular cabinet parts, an optimizer starts with a cutlist: each panel's finished width and height, quantity, material, thickness and any direction or rotation rule. It also needs the boards that can supply those parts. Those may be full sheets, remnants already in stock, or both. The software then tests possible arrangements and cutting sequences, looking for a result that satisfies the rules with a sensible material yield.
People often use nesting as a broad name for every computerized layout. In panel furniture production, the important distinction is the manufacturing process. A beam saw or sliding table saw usually needs straight, practical cutting sequences. A CNC router may support different strategies. The best-looking geometric packing is not automatically the easiest, fastest or safest plan to cut. A useful optimizer therefore balances material use with the machine and handling method the shop really has.
Optimization saves material in several connected ways. It can fit parts into gaps a manual sketch overlooks, compare alternative rotations where rotation is permitted, select a suitable offcut before opening a new board, and combine compatible work so small pieces fill otherwise unused areas. Just as importantly, it makes the trade-offs visible. The operator can reject a fragile sliver, reserve a board, or choose a layout with simpler cuts when production time matters more than a small difference in theoretical yield.
The four inputs that decide whether a layout is real
Kerf: the material the blade removes
Kerf is the width of the cut made by the blade. It is not an abstract line between two parts. That strip of material becomes dust, so every relevant separation in a plan must leave room for it. If the configured kerf is smaller than the cut produced on the saw, dimensions can drift and a row of parts that appeared to fit may no longer fit. If it is set unnecessarily large, the optimizer may reject a valid arrangement or open another board.
Use the value confirmed for the blade and machine setup in service, not a remembered number from another saw. Recheck after meaningful tooling or process changes. The goal is not to make the kerf setting as small as possible; it is to make the digital plan describe the physical cut.
Trims: creating a trustworthy working edge
Sheet edges can be chipped, swollen, out of square or cosmetically unsuitable. A trim allowance removes the uncertain perimeter before finished parts are taken from the board. Shops may need different allowances on different sides, and a clean-looking sheet can still require a trim because squareness matters to every downstream dimension.
Ignoring trim makes utilization look better on screen while transferring the problem to the saw. Excessive trim wastes sound material. Record the shop's working rule and allow an operator to increase it when a particular board arrives damaged. The optimizer should calculate with the usable rectangle after trims, not the supplier's nominal sheet size alone.
Grain direction: an appearance and construction rule
Woodgrain, brushed finishes and other directional décors make orientation part of the design. A tall door rotated sideways may fit a gap perfectly and still be unusable. Grain can also determine how adjacent fronts read as a set. The part record must therefore state whether rotation is locked, allowed, or governed by a project-specific matching decision.
Do not unlock rotation simply to improve a waste figure. Confirm the visible face, the intended direction and any matching requirement first. For non-directional material, permitting rotation gives the solver more valid choices. For directional material, an honest constraint prevents a costly remake.
Stock dimensions and condition: nominal is not usable
A full sheet should be recorded with the dimensions the shop can actually process. An offcut needs even more detail: material identity, thickness, length, width, grain direction, condition and location. A remnant with a broken corner cannot be treated as a perfect rectangle unless the damage has been cut away and the stored dimensions updated.
This is where simple stock discipline becomes a material-saving tool. When the database matches the rack, the optimizer can choose a remnant with confidence. When it does not, operators stop trusting suggestions and reach for a fresh board.
Usable offcuts are inventory, not an optimistic waste label
An offcut becomes valuable only when a future job can find and use it. That requires a clear keep-or-scrap rule. The minimum useful size will vary by material cost, storage space and the kinds of parts the shop produces. A narrow strip of a common white board might be useful for rails; a similar strip of a rare décor may be worth keeping for a repair. There is no single threshold that suits every workshop.
When a layout leaves a useful rectangle, give it an identity. Record the true dimensions after the cut, material and thickness, direction, date and rack position. A printed label or barcode reduces the chance that a physical piece becomes anonymous. When the offcut is later issued to a job, remove or resize its stock record so the next plan does not allocate material that is no longer there.
Be careful with reporting language. A large remnant is not the same as scrap, but it is not a realized saving on the day it is stored either. Track it as recoverable inventory. The saving becomes concrete when that piece replaces material that the shop would otherwise have opened or bought for a later job.
Why job batching can improve material use
A single job may leave gaps too small for any of its remaining parts. Another confirmed job using the same material and thickness may contain drawer components, rails or shelves that fit those spaces. Batching compatible work gives the optimizer a larger set of pieces and often more ways to complete a board.
The word compatible matters. Combine parts only when material identity, thickness, face, grain rules and production timing agree. Preserve the project and part identity on every label so components return to the correct order after cutting. If one project is urgent or not yet approved, mixing it into another run may create more scheduling and handling cost than the layout saves.
A practical approach is to compare two plans: jobs separately and the compatible batch together. Review full sheets required, recoverable offcuts, scrap shape, cut complexity and due dates. The better decision is the one that works across purchasing, cutting and assembly, not merely the one with the highest percentage on a screen.
Measure savings without fooling yourself
Waste reports are useful only when everyone agrees on the definitions. Start with gross material issued to the run: the full boards opened plus any offcuts taken from stock. Separate the finished-part area, recoverable remnants returned to stock, and process loss. Process loss includes kerf, trims and unusable pieces, though a detailed report can show each category separately.
Two views answer different questions. Part utilization compares finished-part area with gross input. It is easy to compare across similar jobs. Net material consumption subtracts verified offcuts returned to stock from gross input before comparing the result with the finished parts. This second view recognizes that usable stock remains, without pretending it has already been reused.
Keep planned and actual results apart. The plan tells you what should happen. Actual board issues, damaged sheets, operator changes and returned offcuts tell you what happened. If the optimizer predicts a good result but physical scrap remains high, investigate the difference: incorrect stock dimensions, a wrong kerf, unrecorded defects, rejected parts, extra setup cuts or offcuts that were never booked back into inventory.
Compare like with like over time. A percentage from melamine kitchens should not be used as the target for every veneered or grain-matched project. Useful reporting groups jobs by material family, machine route or product type and then looks for a trend. The purpose is to improve decisions, not to reward a number that can be made prettier by calling every leftover piece “usable.”
A safe workflow from design to the saw
- Freeze the production revision. Confirm cabinet dimensions, part quantities, visible faces, drilling and edgebanding before optimizing. A layout based on an old revision is not a saving.
- Validate the cutlist. Group parts by exact material and thickness. Check that duplicates are intended and that every label can identify the project, cabinet and part.
- Confirm stock. Verify full-board sizes and inspect any offcuts proposed for the job. Correct the database when a rack piece is smaller or damaged.
- Set physical constraints. Enter the real blade kerf, trims, grain direction and rotation permissions. Apply machine and handling limits that affect the cutting sequence.
- Generate alternatives. Compare layouts where useful. Review board count, remnant shapes and cut practicality rather than accepting the first result automatically.
- Review visually. Look for narrow strips, unsupported pieces, difficult handling, mixed projects and rotations that are technically allowed but aesthetically wrong.
- Release labels with the plan. Keep part identity tied to the correct layout and machine output. If the plan changes, regenerate the connected production documents together.
- Verify the machine route. Confirm a new or changed machine driver with a safe test program and test cut before real production. The operator remains responsible for machine setup and safe operation.
- Close the loop. Record sheets opened, parts remade, real scrap and usable offcuts returned to stock. Use the difference between planned and actual results to correct the next job.
Where Spovex fits in the workflow
Spovex keeps the production data connected to the design rather than treating the cutting plan as an isolated spreadsheet. The room and cabinet design create the part information; the part editor carries details such as drilling; cutlists and labels carry that identity into production. You can see the wider module flow on the Spovex features page.
The Starter tier covers design, rendering, quotes, cutlists and labels. Pro adds the cutting optimizer and machine-driver workflows for Biesse-, Selco- and Homag-class environments; exact compatibility must be confirmed. The published Business launch scope adds ERP for production, workers, attendance terminals and finance, designed to run on the customer's PC rather than a customer cloud. The pricing and feature matrix shows the approved tiers.
The point of that connection is traceability. A design change should flow into the part list, layout and label instead of being corrected separately at three stations. Operators can still review and make the production decision; the software gives them consistent information on which to base it.
Questions cabinet shops often ask
Does an optimizer replace an experienced saw operator?
No. It can search many arrangements quickly and apply recorded constraints consistently. The operator understands board condition, lifting and support, machine behavior, schedule pressure and when a theoretically efficient sequence is awkward in practice. The strongest process combines software calculation with an informed review.
Should the shop always choose the layout with the least scrap?
Not automatically. A small theoretical gain may require many extra cuts, difficult handling or an offcut shape that looks large but is unlikely to be reused. Compare material, time, safety, machine rules and recoverable inventory together.
Can optimization begin before the design is final?
A provisional plan can help estimate purchasing, but it must not become a released production plan. Once dimensions, quantities or material choices change, optimize again from the approved revision and reissue the connected labels and machine files.
What is the first improvement for a shop using manual layouts?
Clean the inputs before chasing advanced settings. Confirm material names, stock sizes, kerf, trims and grain rules, then label usable offcuts. Reliable data makes both manual review and computerized optimization better.
Turn one real cutlist into a measured test
Choose a completed job whose boards, parts and offcuts can still be verified. Rebuild the plan with the real constraints, compare it with what the shop used, and write down why the results differ. That single exercise reveals more than a generic saving claim because it reflects your materials, machines and working rules.
Bring a real cabinet or kitchen job and evaluate the workflow with production data you know. Book a live demo, or review the plans first.